WordPress deployment with Amazon RDS

Studying Electronics and Communication Engineering at Chandigarh Engineering College. Learning Devops and Data Structures & Algorithms. Exploring new technologies and blogging.
Introduction
WordPress is a flexible content management system for building blogs, e-commerce sites, discussion boards, and more. For whatever kind of website you’re making, you will have content to store. This content needs to be permanently stored somewhere. WordPress uses MySQL to store this content. A lot of the data in a WordPress application is hierarchical, structured data. For example, your application may have blog posts that have user-submitted comments. A relational database is a good choice for storing hierarchical data like this.
Amazon RDS
Amazon Relational Database Service (Amazon RDS) is a collection of managed services that makes it simple to set up, operate, and scale databases in the cloud.
Many installation guides for WordPress use a MySQL database that is on the same server as the WordPress installation. This may be sufficient to start but it might cause some problems like competing for computing resources which will hurt the site's performance. Furthermore, managing a database is not an easy task and in most cases, we will need to hire a Database Administrator which can be quite costly.
To solve this issue Amazon provides us with the RDS service which is a managed database service. We don't need to take the load of managing the database or hire a Database Administrator, amazon will do that for us. Also, it's easy to configure the database in RDS however we like. Finally, Amazon RDS for MySQL has automated backups and security patches to help us with your database administration.
In this article, we will deploy WordPress with Amazon RDS.
Refer to this link for more information on RDS.
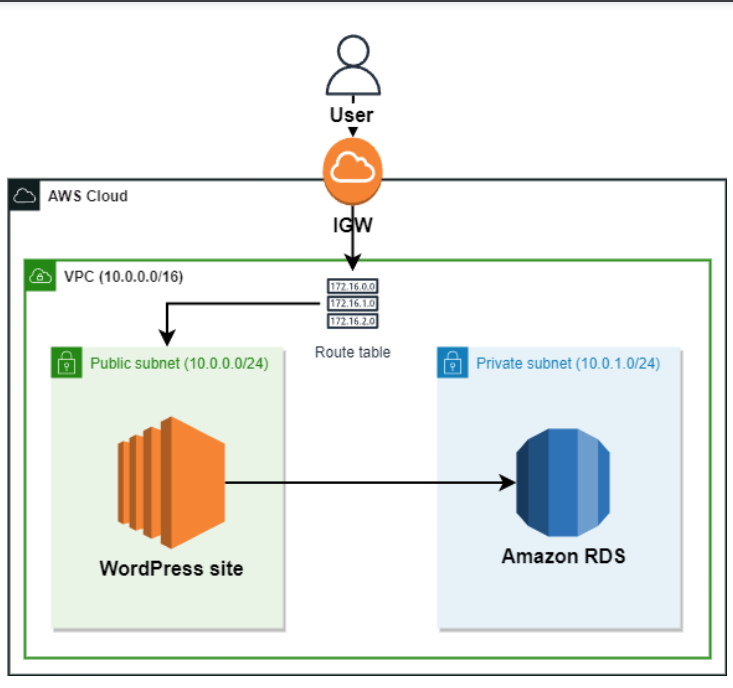
Creating Public & Private subnets in our VPC
Amazon Virtual Private Cloud (VPC) is a service that lets you launch AWS resources in a logically isolated virtual network that you define. You have complete control over your virtual networking environment, including selection of your own IP address range, creation of subnets, and configuration of route tables and network gateways. You can use both IPv4 and IPv6 for most resources in your VPC, helping to ensure secure and easy access to resources and applications.
Step 1: Create a VPC
Navigate to the VPC service.
Click on Create VPC
Select VPC Only
Name your VPC as
my-vpc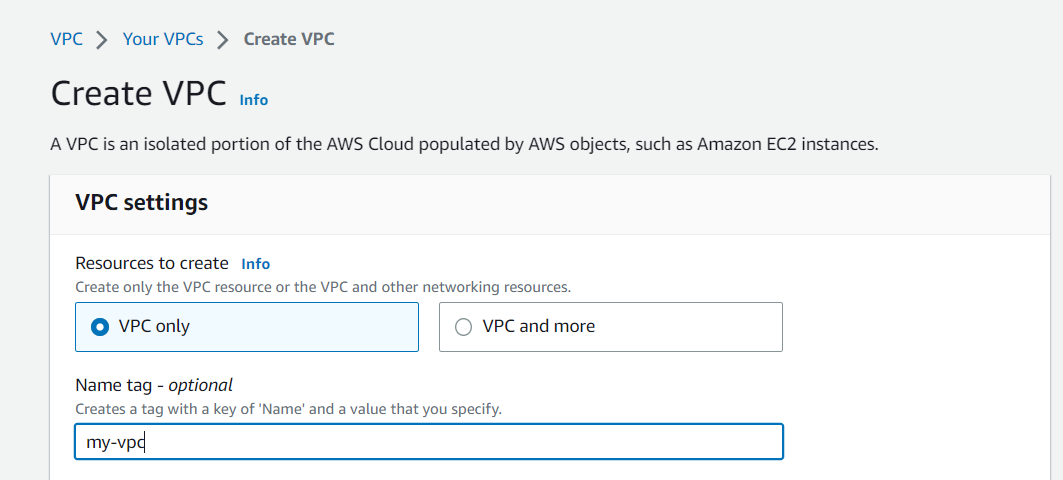
Select your IPV4 CIDR range as shown below and set tenancy as Default.
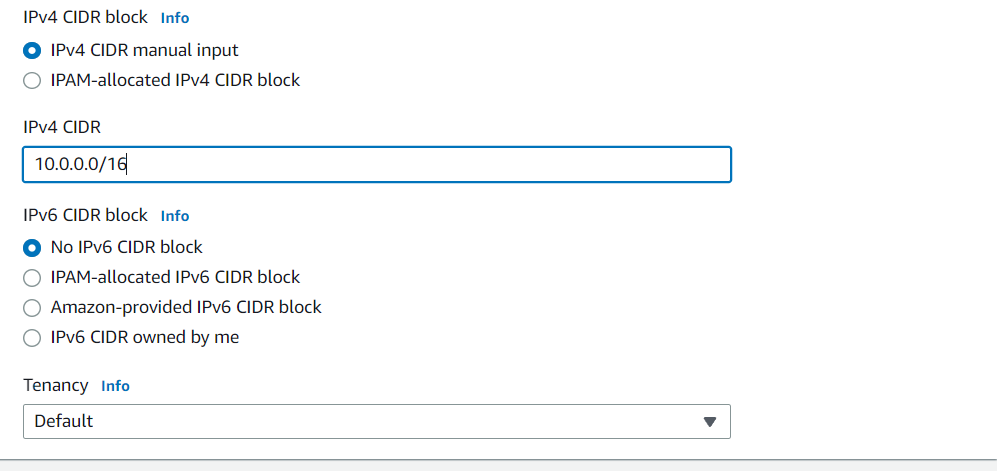
Click on Create VPC.
Step 2: Creating Public & Private Subnets
Public subnets are used to deploy the web servers which has access to the internet. We will deploy our WordPress site in the Public subnet.
Private subnets are used to deploy databases that need high security and cannot be accessed through the internet directly.
Navigate to subnets in the VPC section.
Click on Create subnet.
Select the VPC that you made before.
Name your subnet as
public-subnetthen select AZ & IPV4 CIDR block as shown below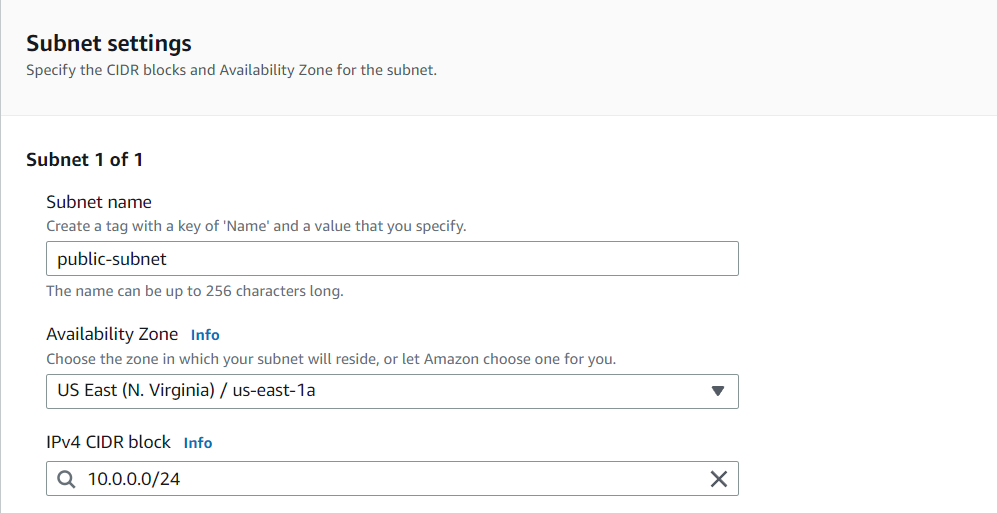
Click on Add new subnet and create a private subnet this time using the same steps as above, and change the range of the IPV4 CIDR block.
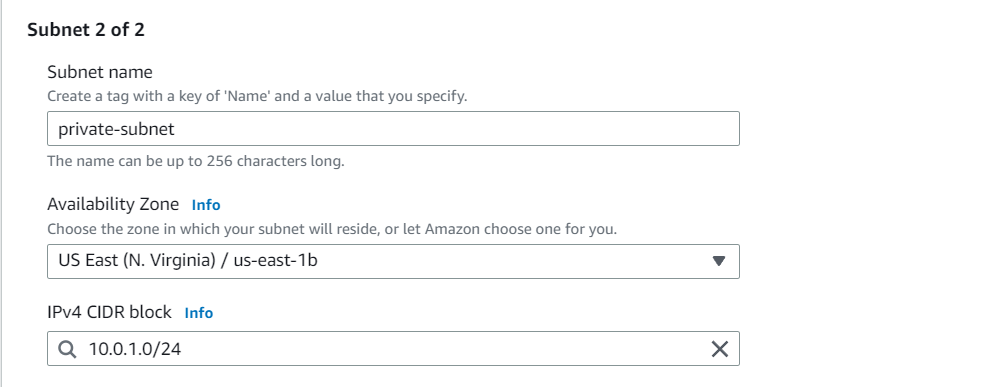
Click on Create Subnet.
Enable Auto assign IP
After creating your subnets, navigate to your public subnet and click on the Actions menu and select Edit subnet settings. Check the Enable auto-assign public IPV4 address option and save the settings.
This step is required to enable the public IPV4 addresses for our public instances.
Granting Internet access to Public Subnet
The public subnet we created in our VPC is isolated from any internet access. Internet access is essential for the public subnet to allow SSH into the instance we create in it. Without internet access, we won't be able to download and update files either.
To allow access to the Internet we need to associate the public subnet with a route table that directs the traffic to an Internet Gateway (IGW):
Navigate to your VPC services.
Click on the Route Tables section.
Click on Create Route table.
Name it
my-route, selectmy-vpcand hit Create route table.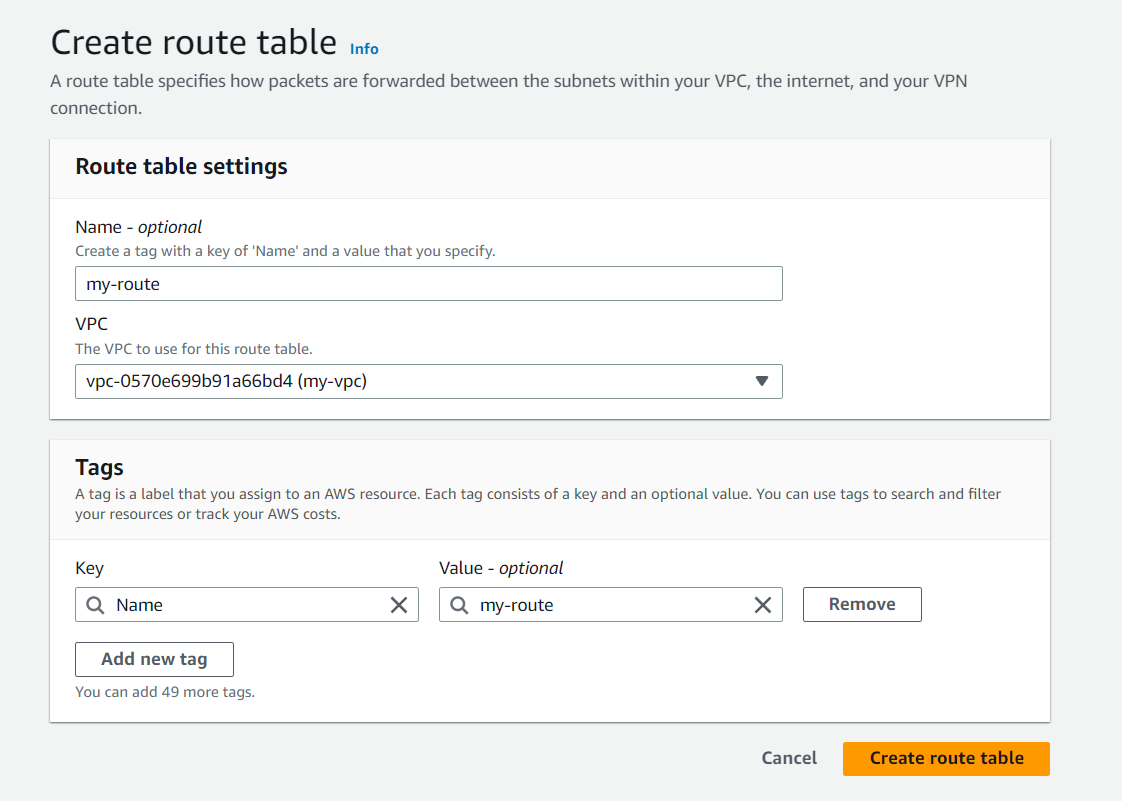
Next, in the vpc services select the Internet gateways section.
Click on Create internet gateway.
Name it
my-igwand select Create internet gateway.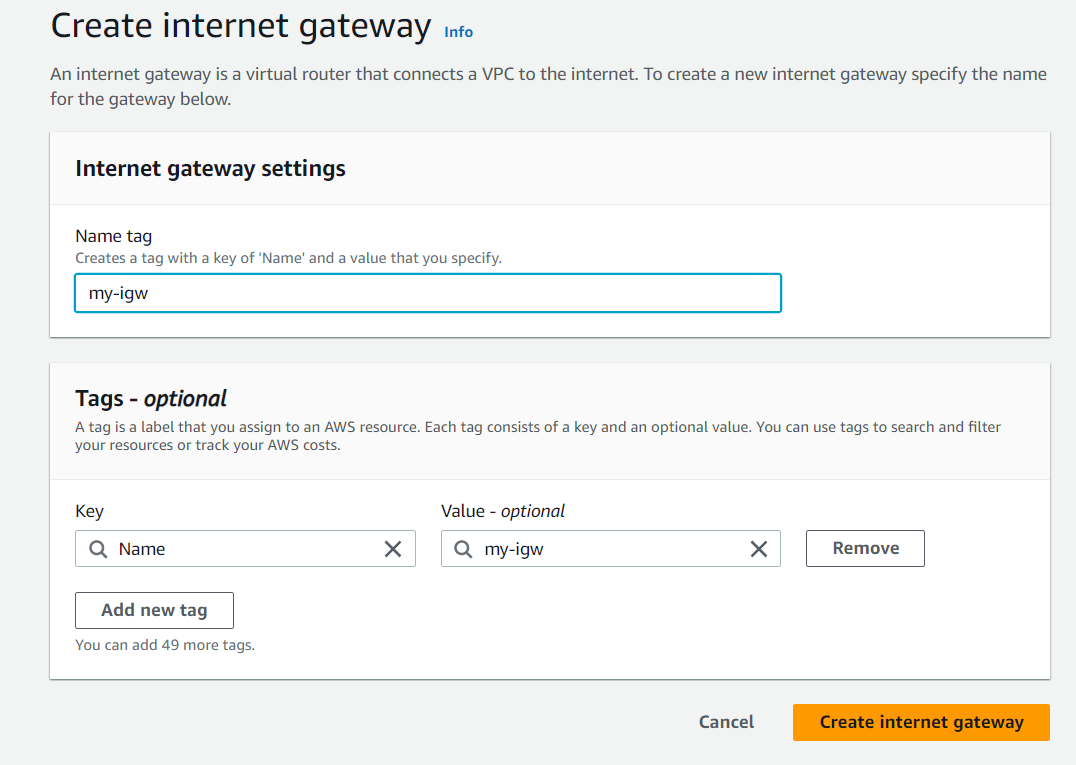
Now that the Internet gateway is created we need to attach it with
my-vpc.After creating
my-igw, in the actions select Attach to vpc and then choosemy-vpcto attach with it.Now navigate to your route tables section and select
my-route.Select the routes section and choose edit routes.
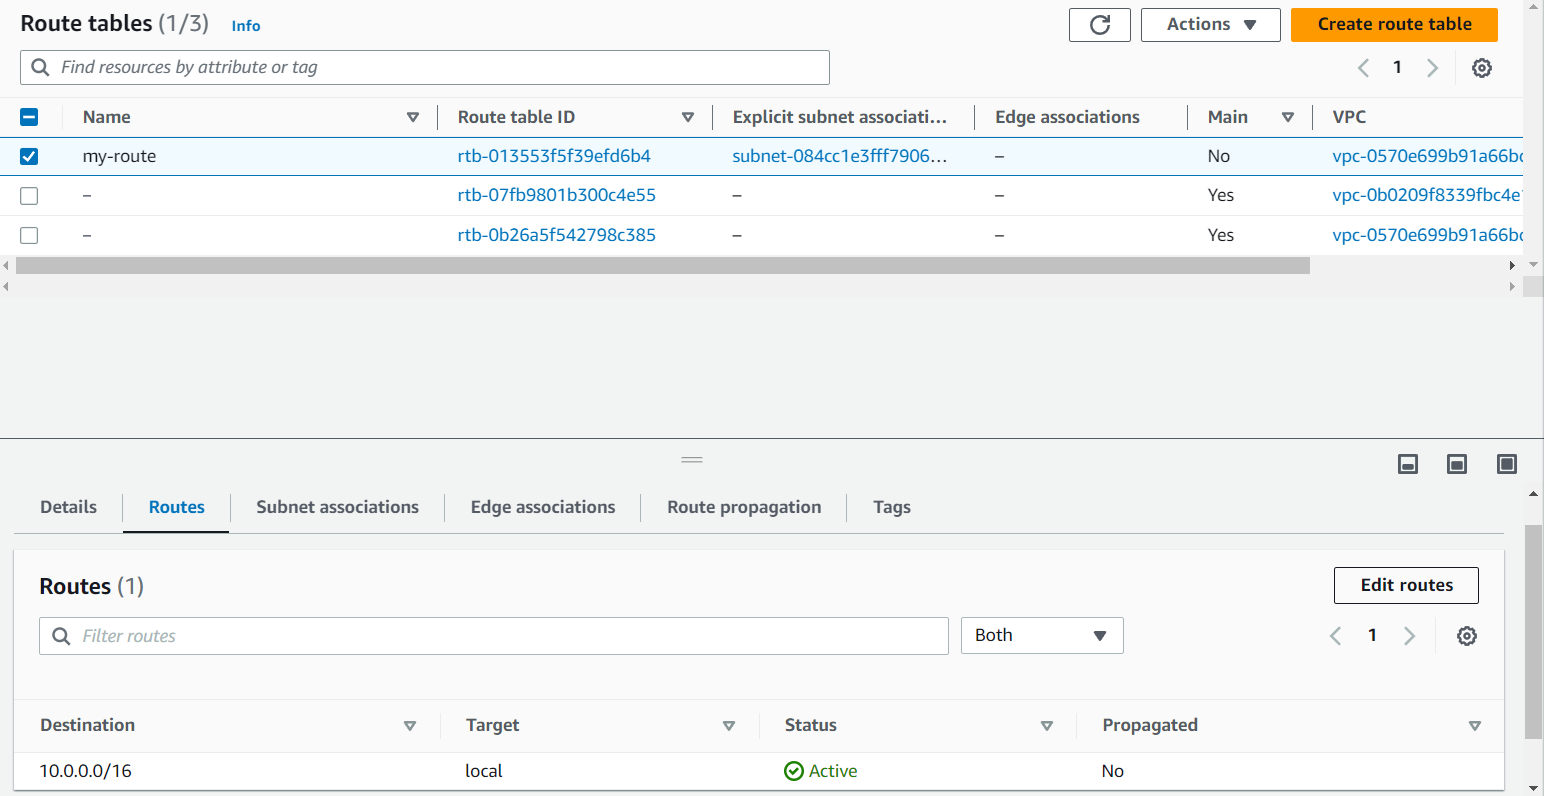
In the edit routes select add route, choose the destination as
0.0.0.0/0and choose the target as the Internet gateway.
Then hit Save Changes.
Next, navigate to subnet associations in the route tables section.
Choose edit subnet associations.
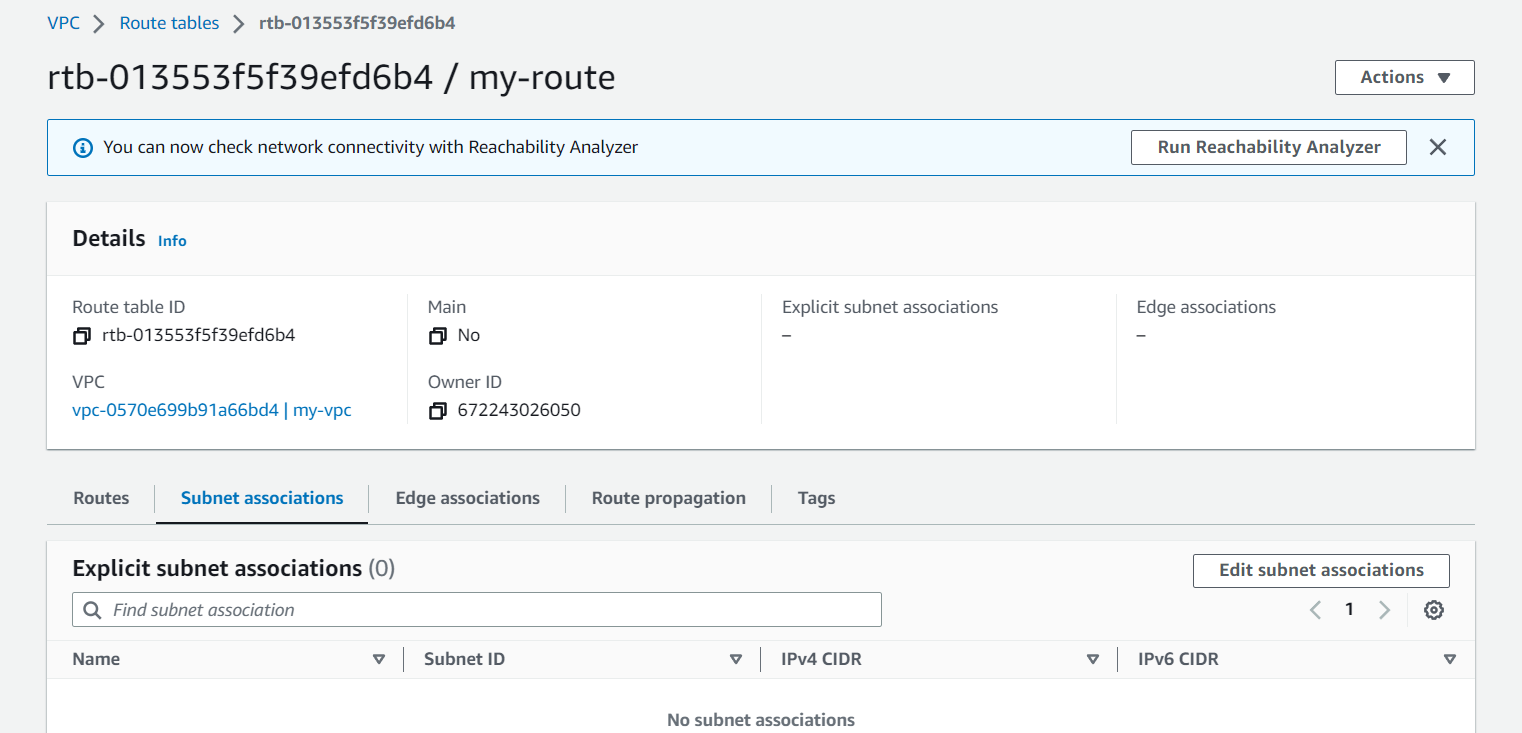
Select the
public-subnetand choose Save associations.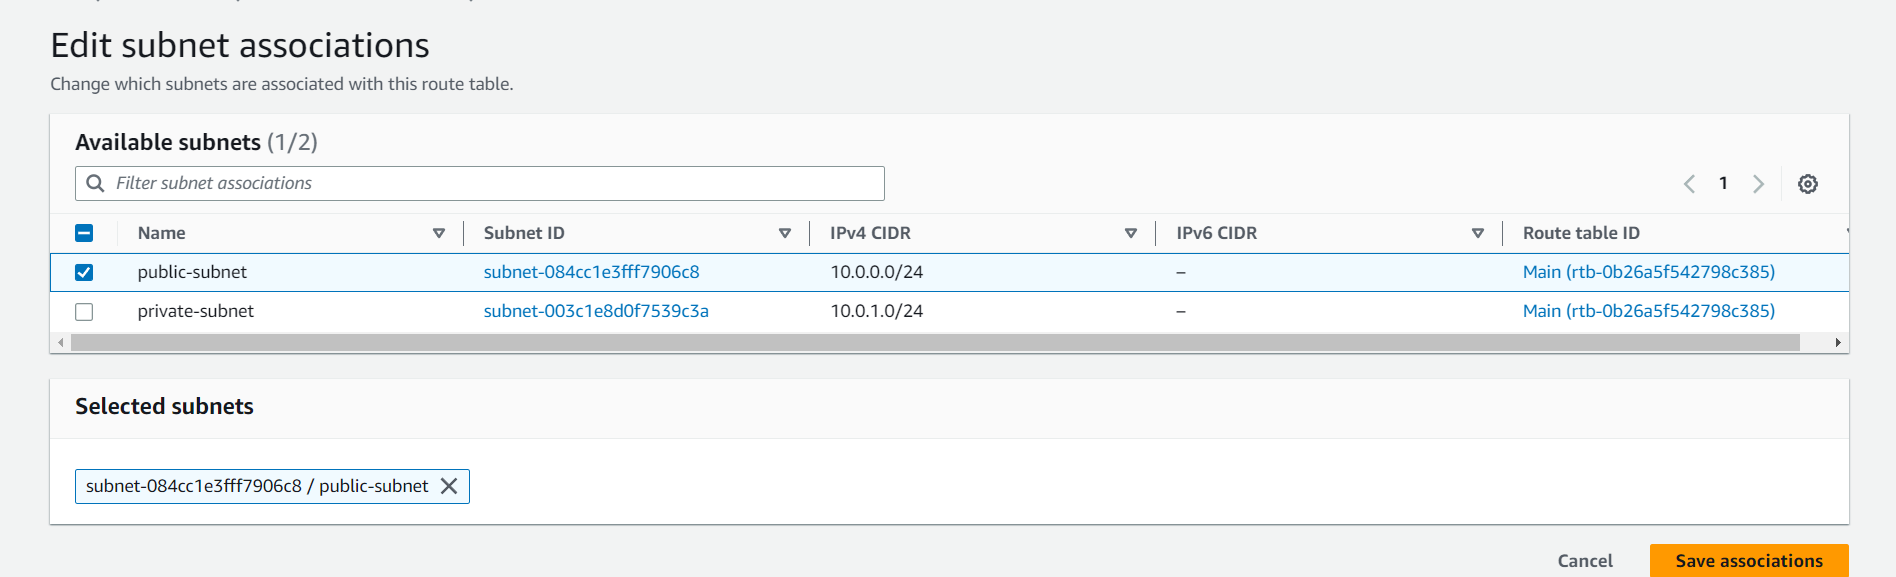
Now we have successfully granted internet access to our public subnet. This step would be necessary for the coming section when we would SSH into our wordpress instance.
Launch EC2 instance
The next step is to launch an EC2 instance in the public subnet to deploy our WordPress site.
Step 3: Launch an EC2 instance
Navigate to EC2 service.
Click on Launch Instance.
Name it as
wordpressand choose the AMI as Amazon Linux 2.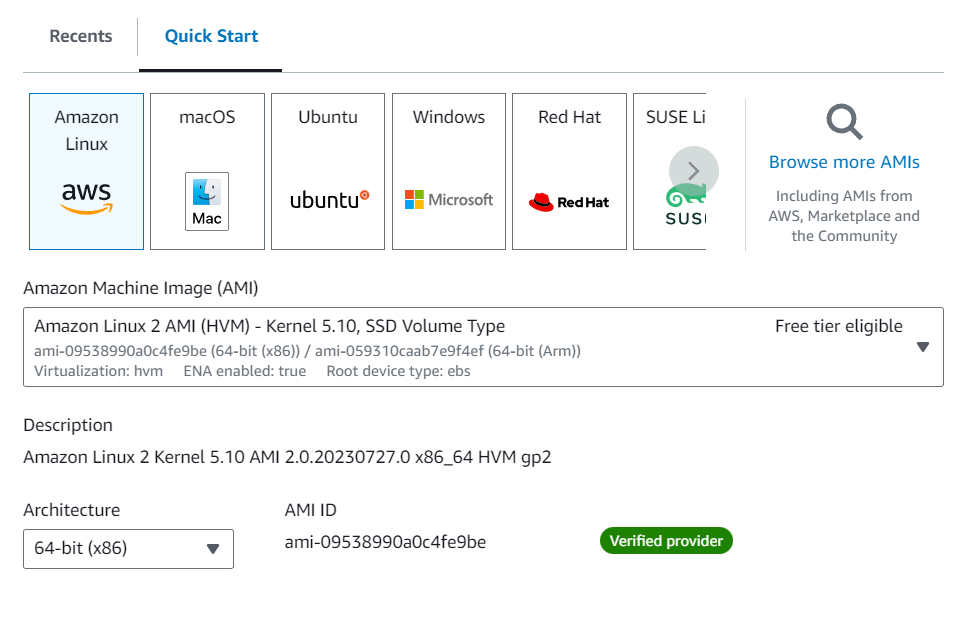
Select the instance type as t2.micro and make a keypair in the
.pemformat or you can choose any existing keypair.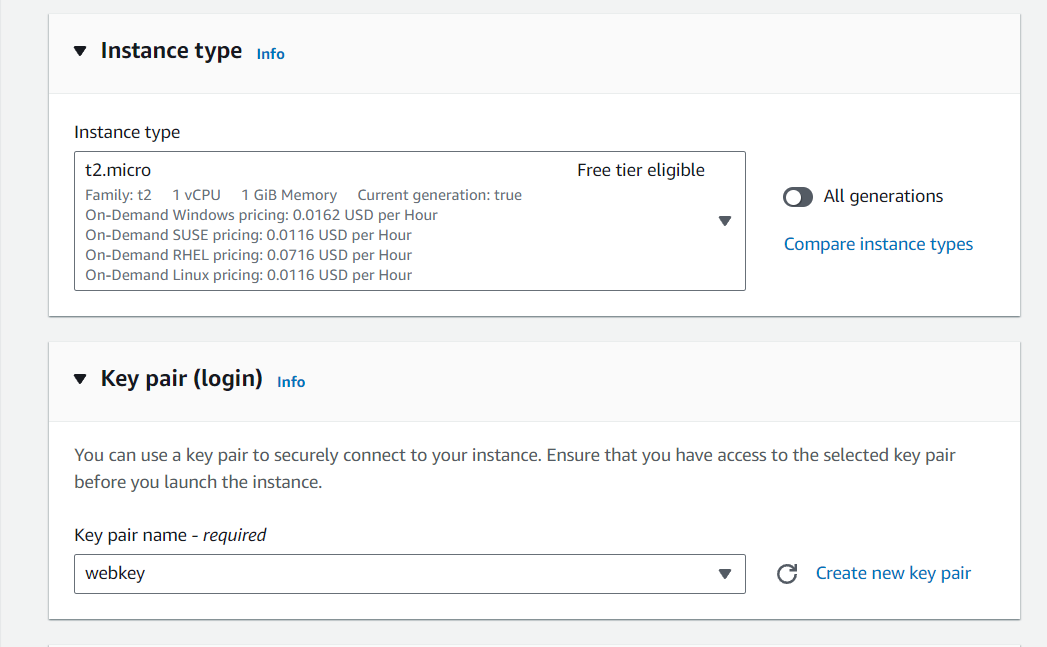
In the network settings click on edit and change the vpc to
my-vpcthat we created earlier. Also, select thepublic subnetin your subnet group.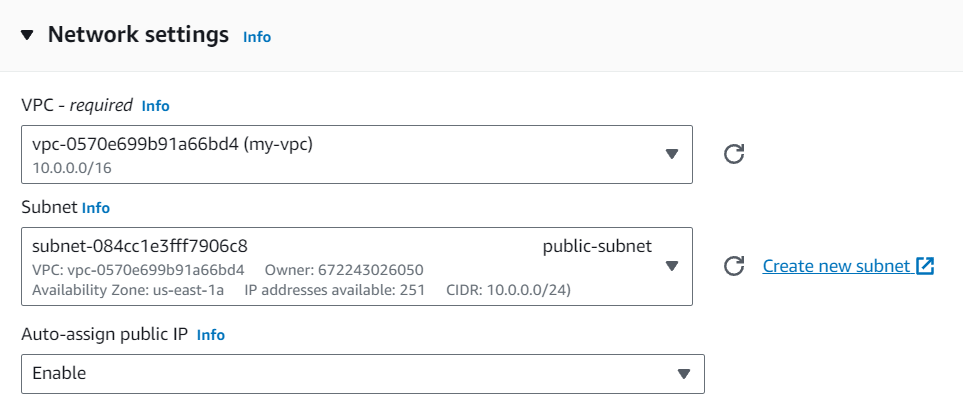
In the firewall settings below create a security group named
public-SGand enable the HTTP port to allow HTTP traffic from the internet.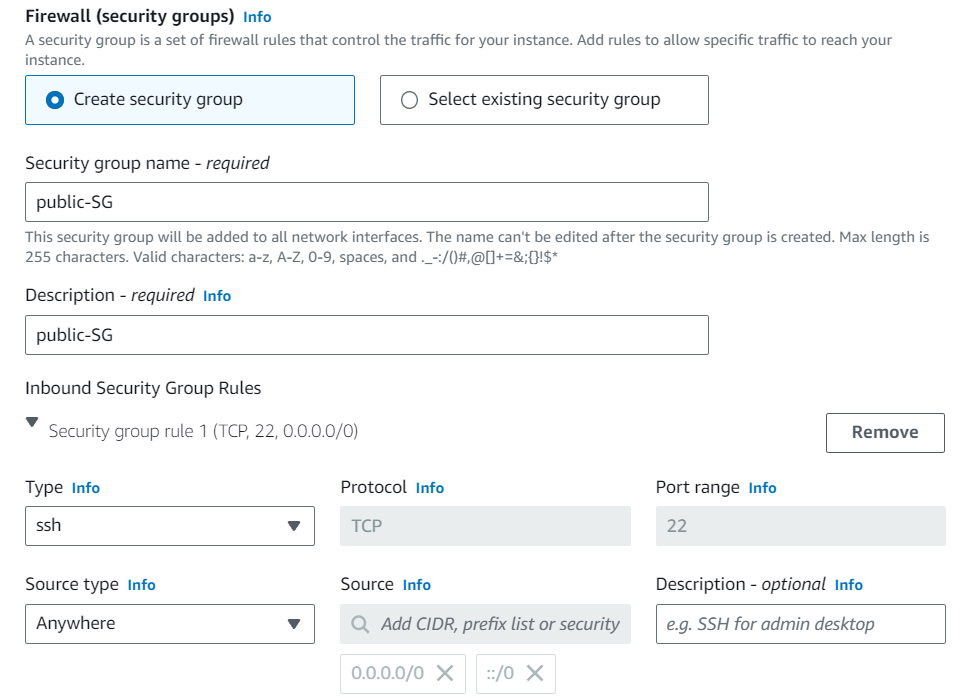

Click on launch instance and your instance will be created.
MySQL Database with Amazon RDS
Now that we have launched a Wordpress instance we will need a database to store the user data of Wordpress. For that, we will create a MySQL database and configure it with Amazon RDS.
Step 4: Creating MySQL database
Navigate to Amazon RDS and click on Create database.
Choose the standard create option and MySQL in the engine option.
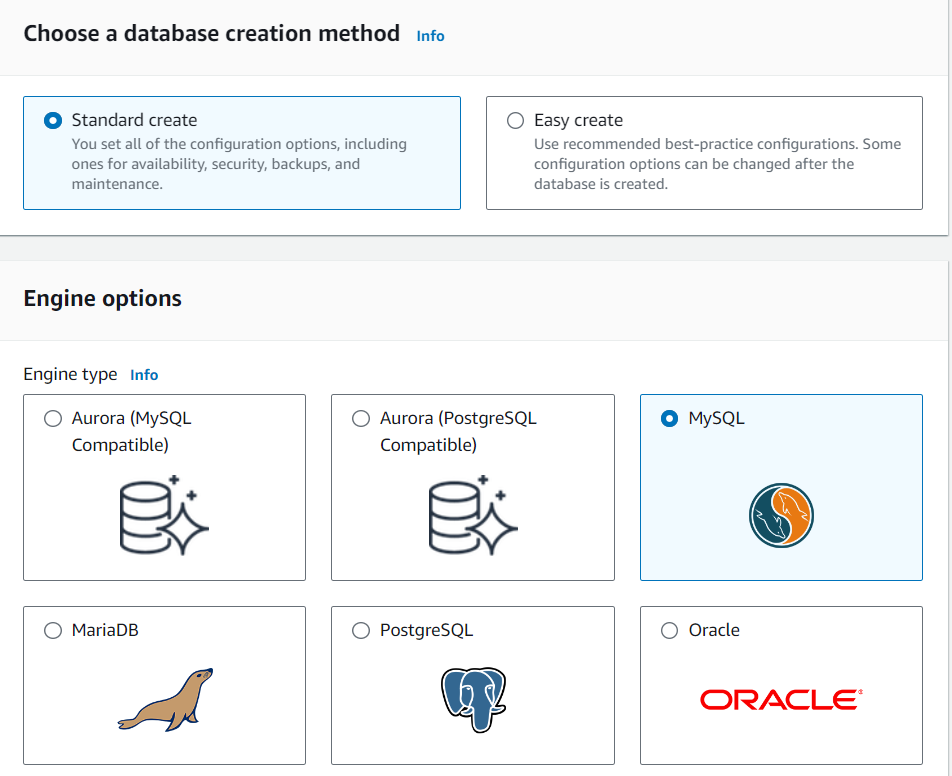
Choose the free-tier option in the templates.
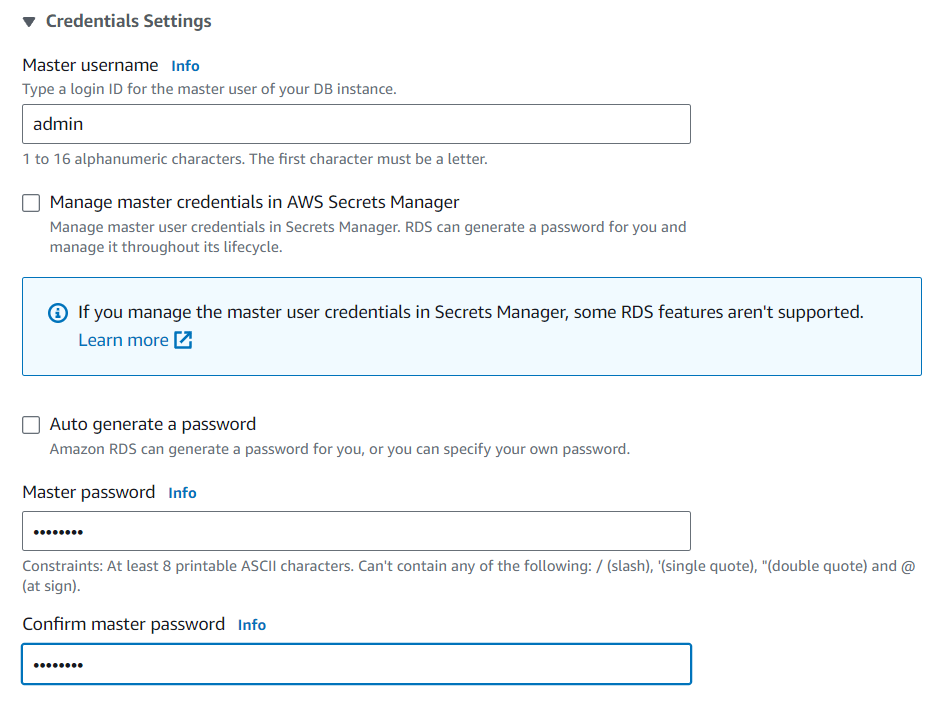
In the settings below, name it
wordpress.In the credentials settings give a master username and set a strong password which will be needed to connect to the database later.
In the Instance Configuration select the instance class as Burstable classes and the instance type as db.t3.micro.
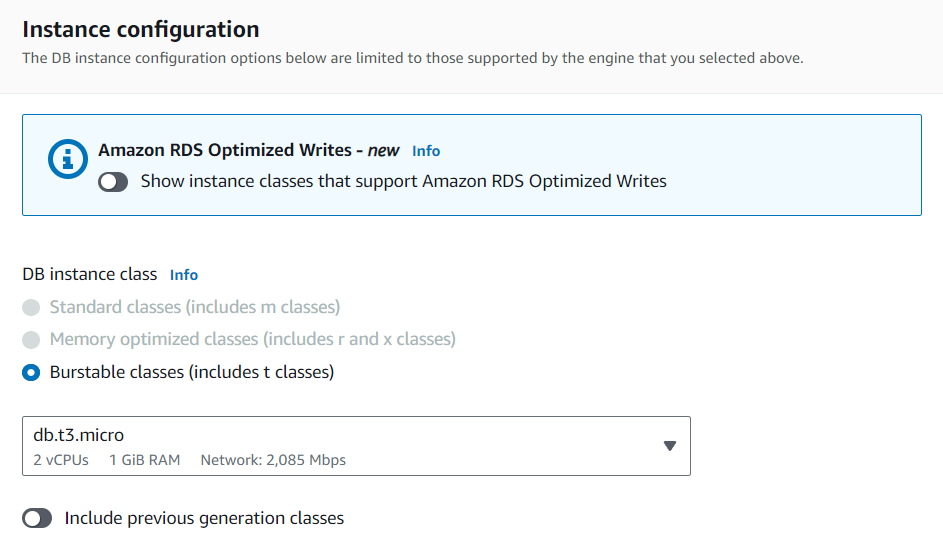
Select the default storage settings.
In the connectivity settings change the vpc to
my-vpcand select no in Public access.
Create a new security group in the vpc firewall and name it
private-SG, you can choose any availability zone you want.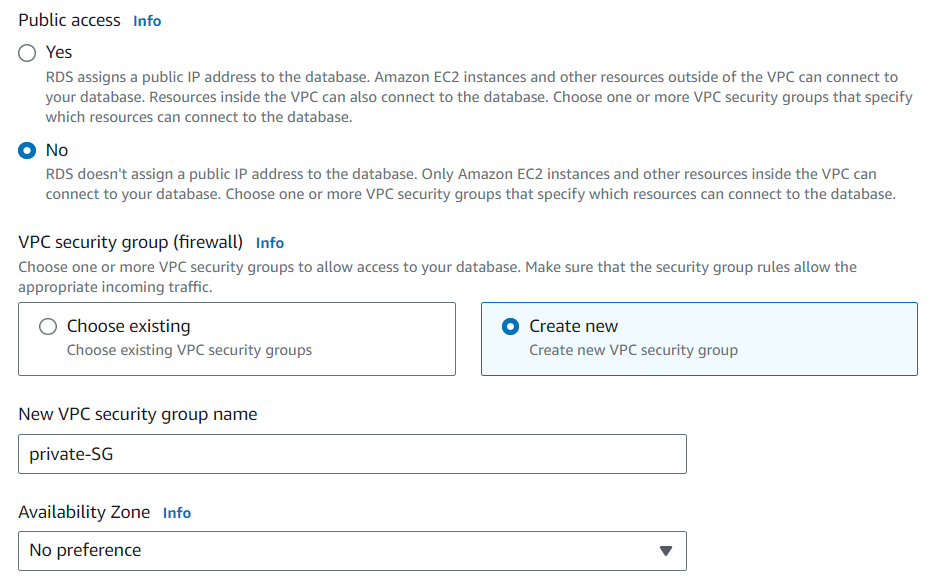
Let the other settings be in their default configurations and move on to the Additional configuration.
In the Additional configuration name your database as
wordpressdband leave the other settings at default.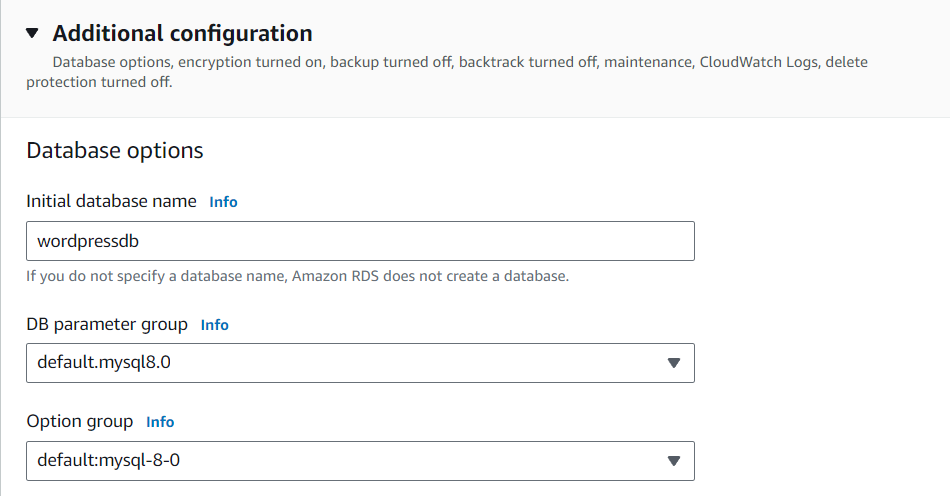
You can enable the automated to create a snapshot of your RDS if you want.
Finally, click on Create database and your database will be created after a few minutes.
Step 5: Configuring Amazon RDS Database
Now that we have created an Amazon RDS successfully, the next step is to configure our Amazon RDS database to allow access to specific entities.
Navigate to your Amazon RDS.
Click on the
wordpressdatabase that we created earlier.Scroll below and you will see the Security section.
Click on the security group listed in the VPC security groups.
Select the inbound rules tab and click on edit inbound rules.
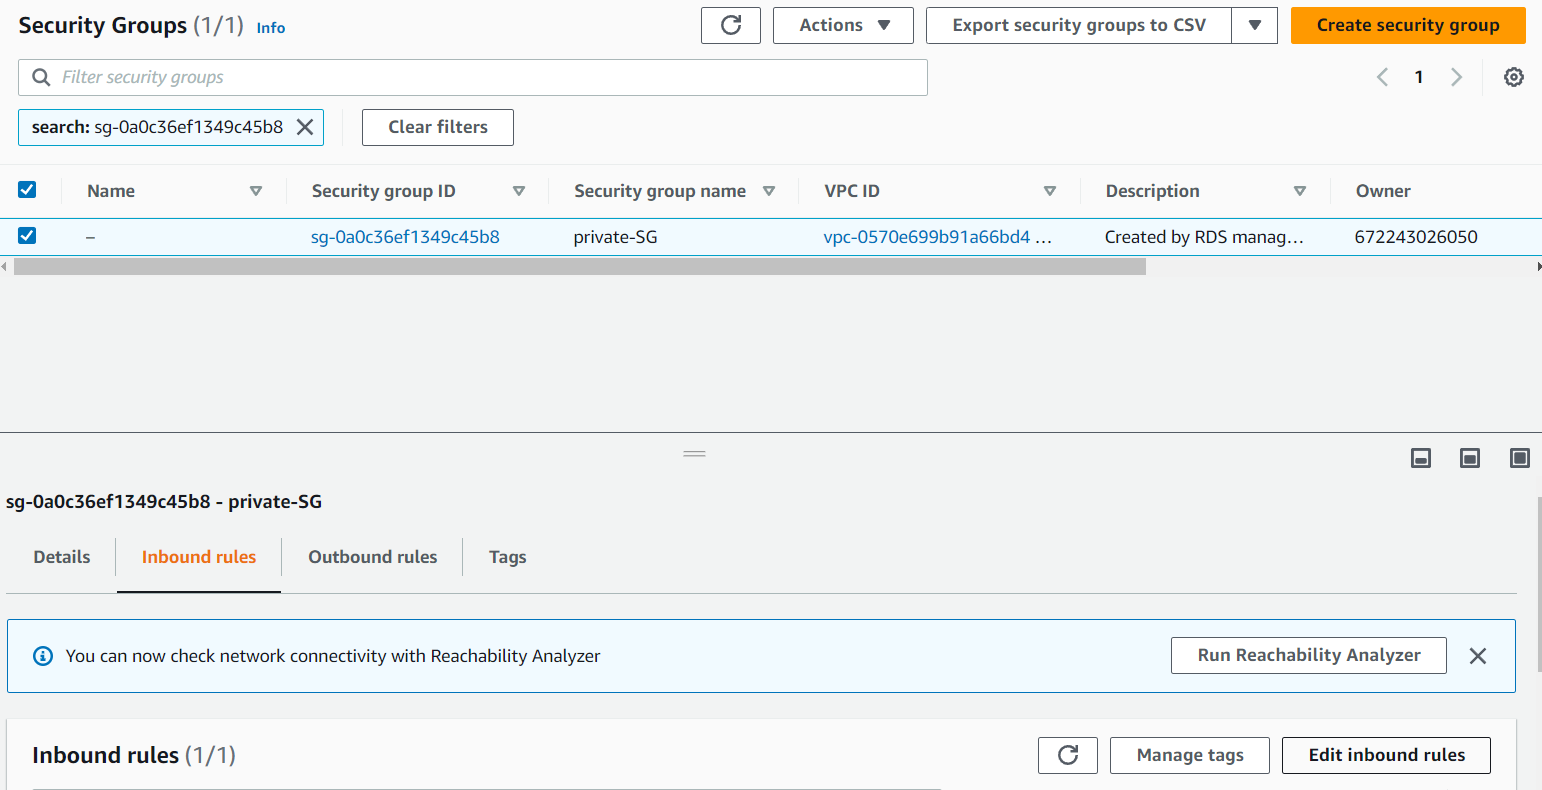
Delete the existing security rules and add a new one by changing the type to MySQL/Aurora and adding the source value by searching for
public-SG.Select the
public-SGthat appears in the search box and save the rule.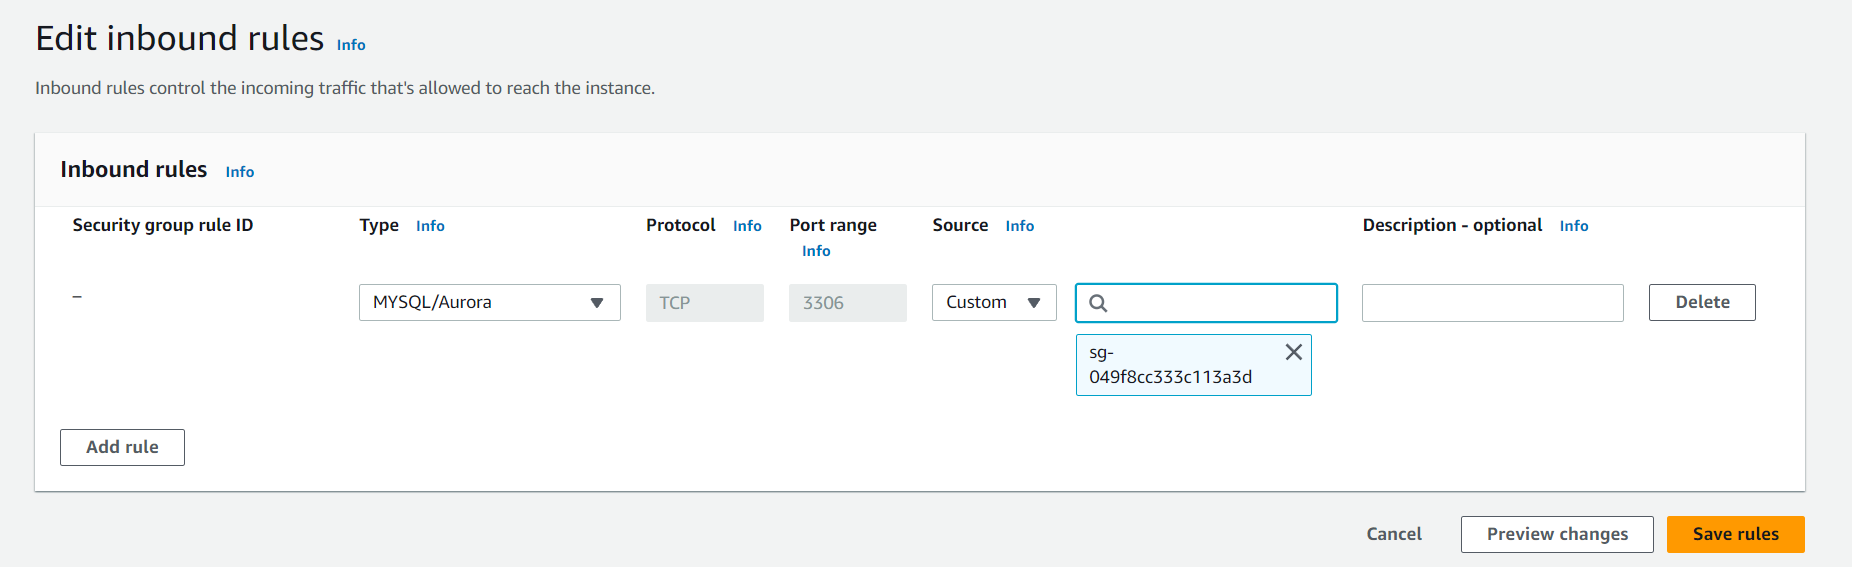
This rule will allow MySQL access to any EC2 instance with that security group configured.
Step 6: SSH into your instance
Now that we have configured our Amazon RDS, we need to SSH into our wordpress instance and create a database user to connect our MySQL database.
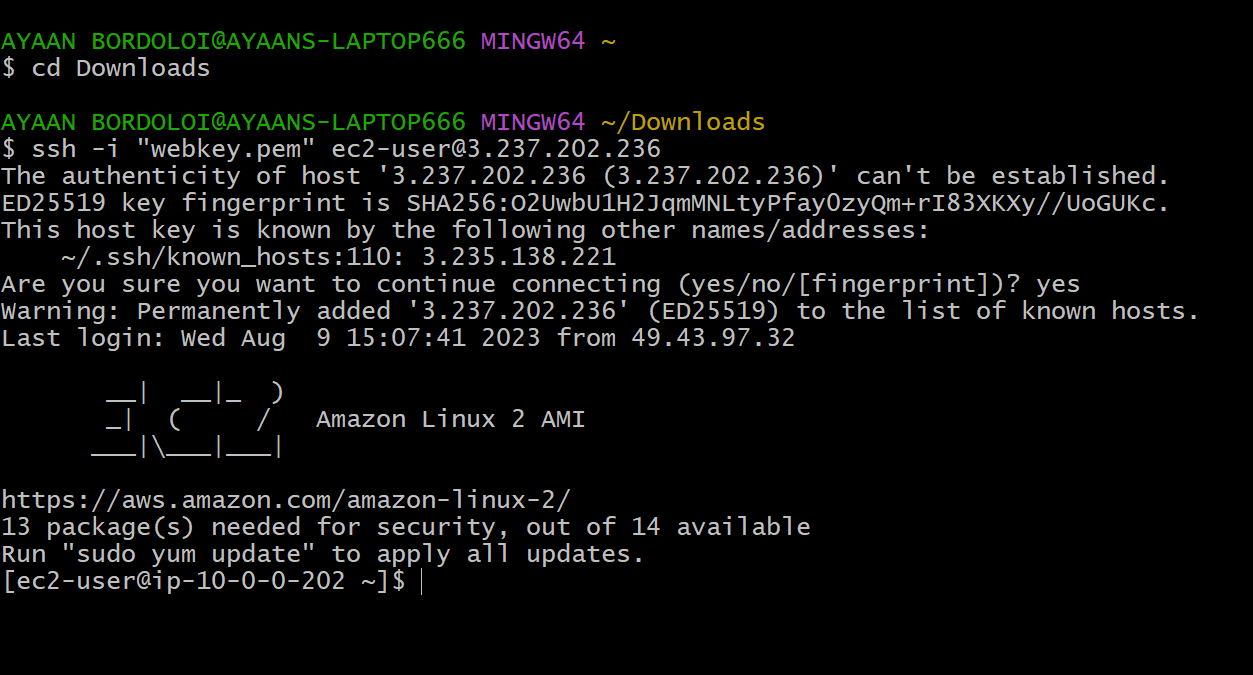
First, go to your git bash or any other Linux terminal and change the directory to your downloads folder where your security key has been downloaded with the
cd Downloadscommand.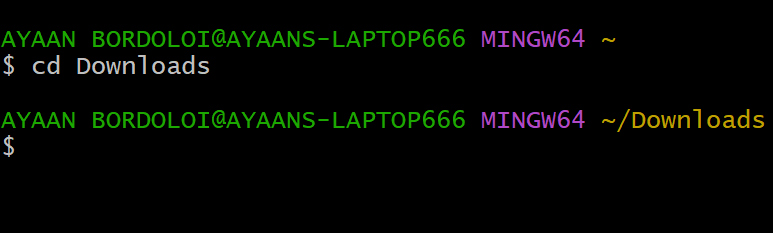
Then navigate to your running instances and select the connect option at the top of your running instance.
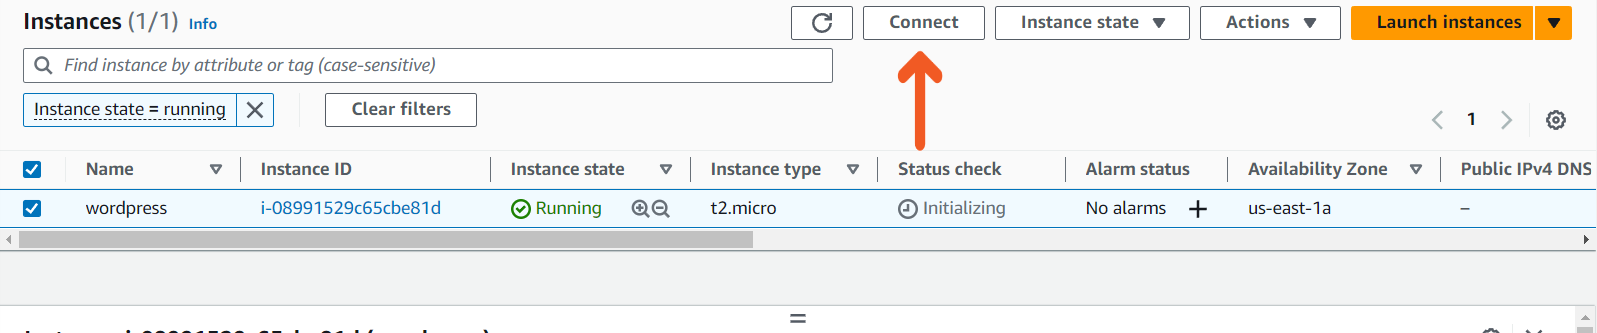
Select the SSH client section and copy the command given below to connect to your instance through SSH.
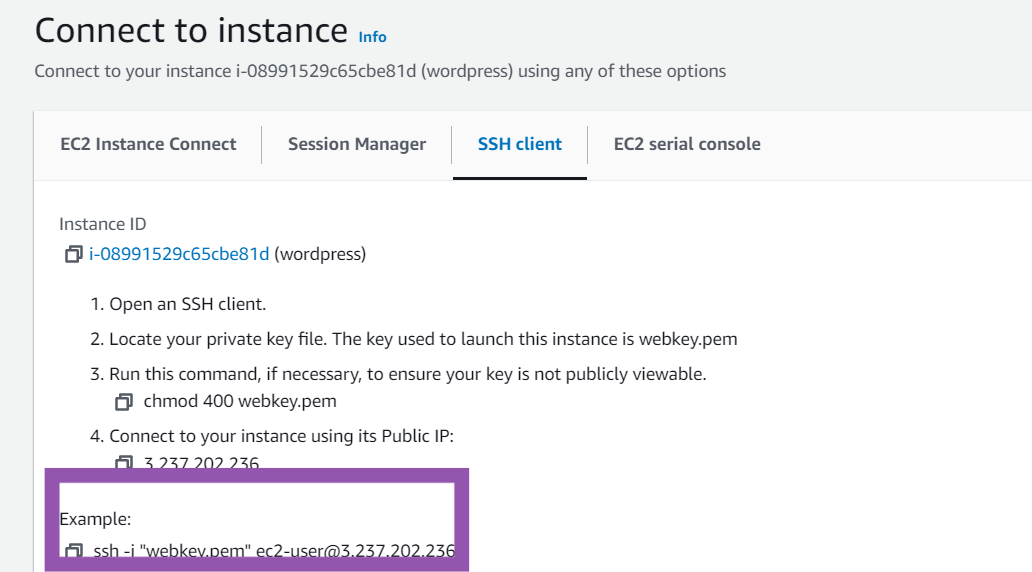
Open Gitbash and paste the command, then hit enter and type yes for verification.
You will be logged into your Amazon Linux 2 AMI.
Step 7: Creating a Database user
After logging in to our instance we need to create a database user.
First, run the following command in your terminal to install a MySQL client to interact with the database.
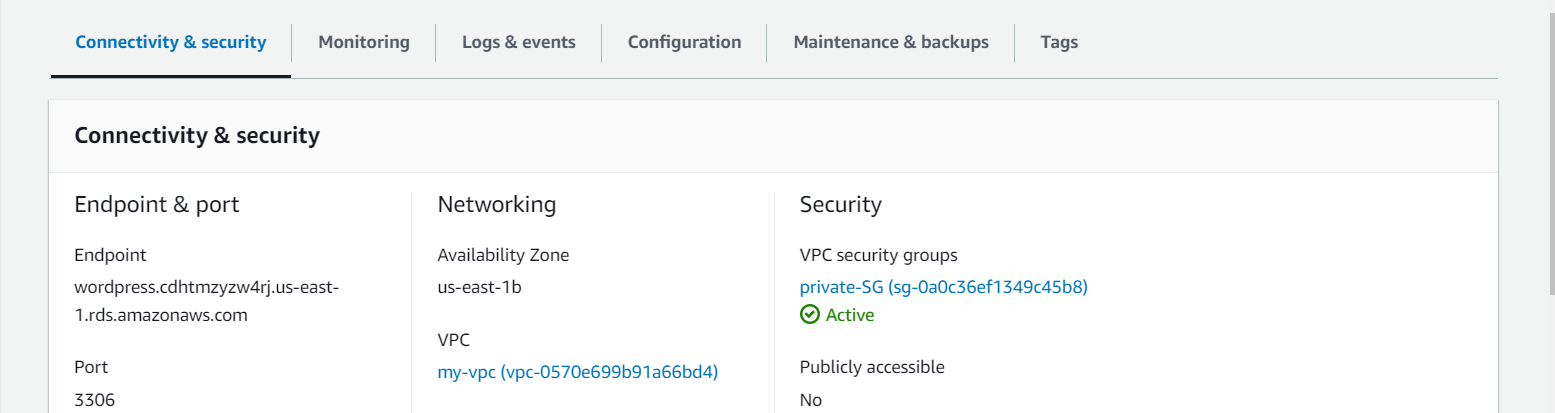
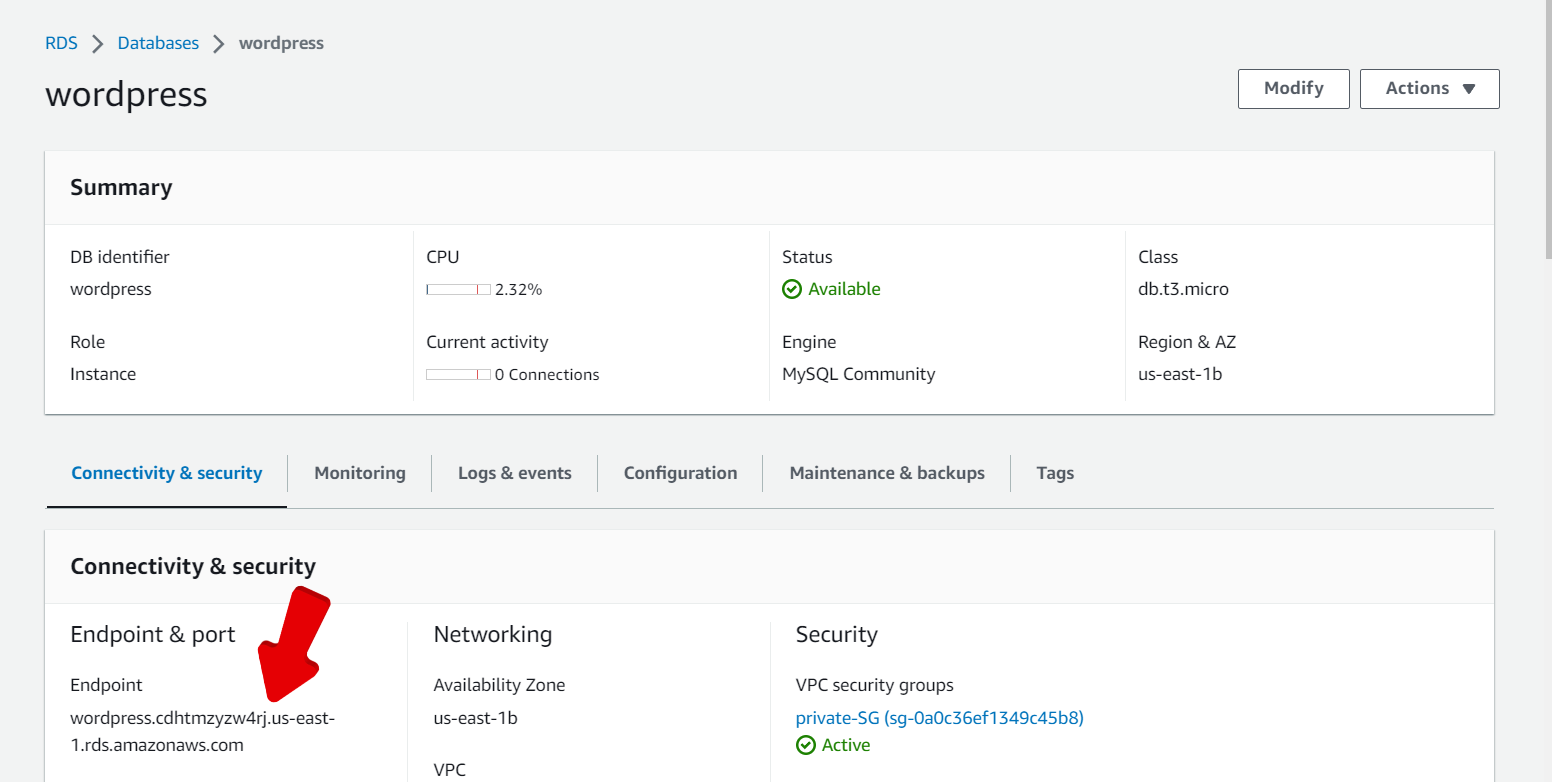
sudo yum install -y mysqlNext, find the hostname for your Amazon RDS database in the AWS console. In the details of your Amazon RDS database, the hostname will be shown as the Endpoint in the Connectivity & Security section.
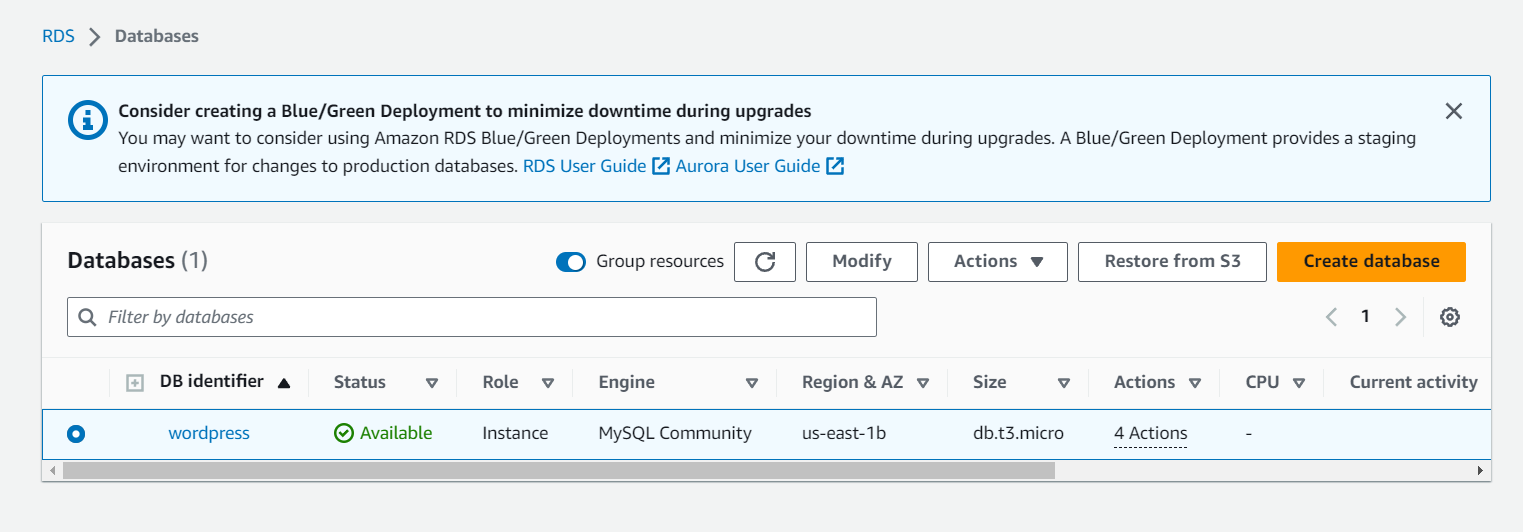
Go to the Amazon RDS databases page in the AWS console. You should see the wordpress database you created for the WordPress installation. Select it to find the hostname for your Amazon RDS database.
In the details of your Amazon RDS database, the hostname will be shown as the Endpoint in the Connectivity & security section.
In your terminal, enter the following command to set an environment variable for your MySQL host. Be sure to replace
“<your-endpoint>”with the hostname of your RDS instance.export MYSQL_HOST=<your-endpoint>Next, run the following command in your terminal to connect to your MySQL database. Replace “<user>” and “<password>” with the master username and password you configured when creating your Amazon RDS database.
mysql --user=<user> --password=<password> wordpressdbIn our case, we named the user admin.
Finally, create a database user for your WordPress application and give the user permission to access the wordpress database.
Run the following commands in your terminal one by one:
  1. CREATE USER 'wordpress' IDENTIFIED BY 'wordpress-pass';
  2. GRANT ALL PRIVILEGES ON wordpress.* TO wordpress;
  3. FLUSH PRIVILEGES;
  4. Exit
As a best practice, you should use a better password than wordpress-pass to secure your database.
Write down both the username and password that you configure, as they will be needed in the next step when setting up our WordPress installation.
Step 8: Configuring WordPress on EC2
Till now, we have done a lot of configuration setup. We created an Amazon RDS instance and an EC2 instance. We allowed network access from our EC2 instance to our Amazon RDS instance. We learned how to use SSH to connect to our EC2 instance and configured a database user to be used by WordPress.
In this step, we will finish up the work to make our WordPress site live. We will install the WordPress application and dependencies on the EC2 instance. At the end of this module, we will have a WordPress installation that is accessible in the browser from anywhere in the world.
SSH to connect to your EC2 instance as we did it before.
To run WordPress, you need to run a web server on your EC2 instance. The open-source Apache web server is the most popular web server used with WordPress.
To install Apache on your EC2 instance, run the following command in your terminal:
sudo yum install -y httpdTo start the Apache web server, run the following command in your terminal:
sudo service httpd start
You can see that your Apache web server is working and that your security groups are configured correctly by visiting the public IPV4 address of your EC2 instance in your browser.
- Go to the EC2 Instances page and find your instance. In the Description below, find the Public IPv4 address of your instance.
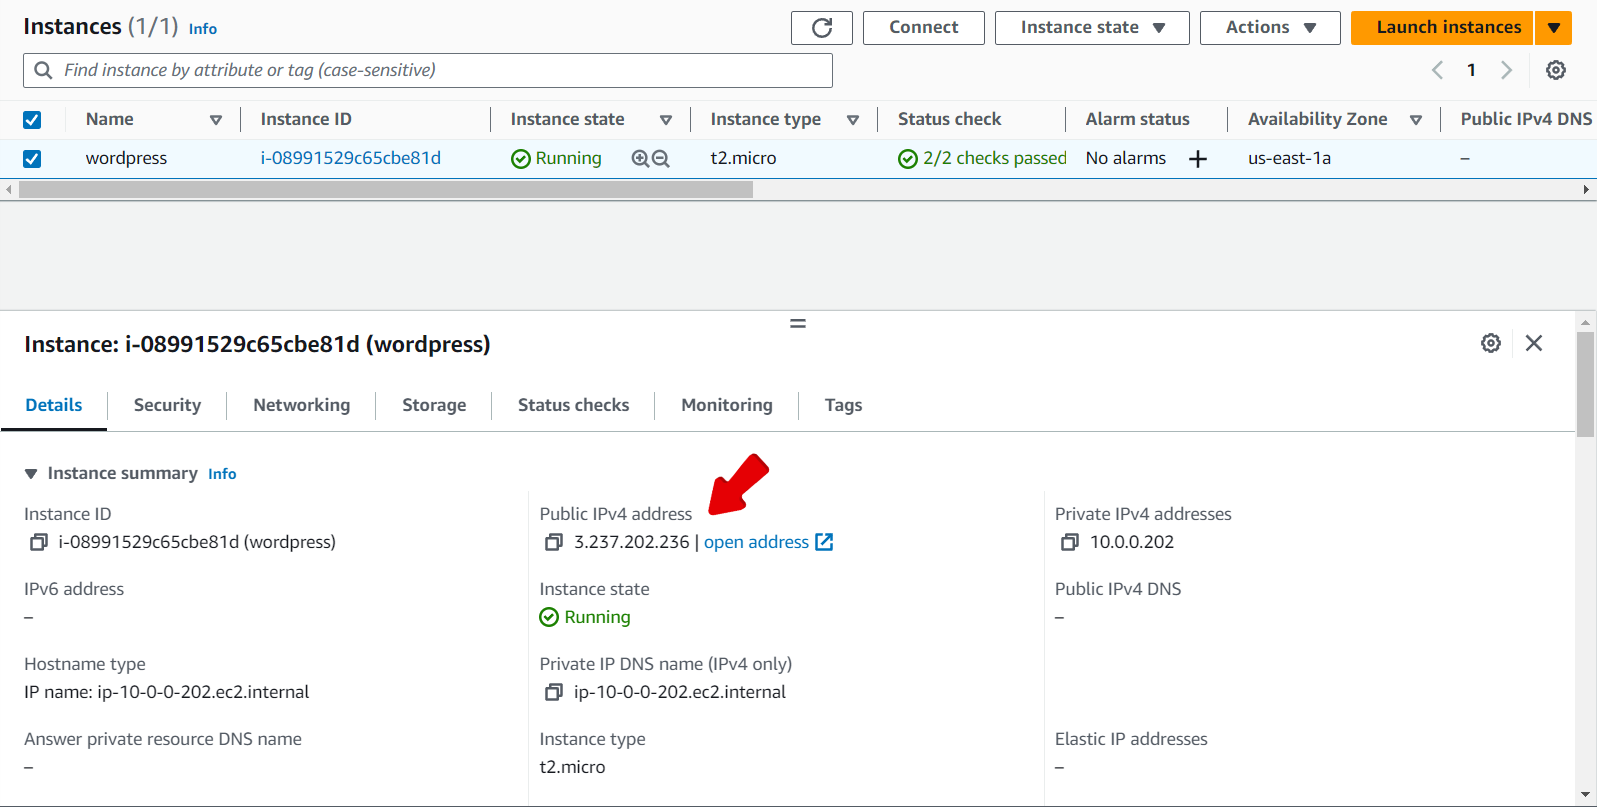
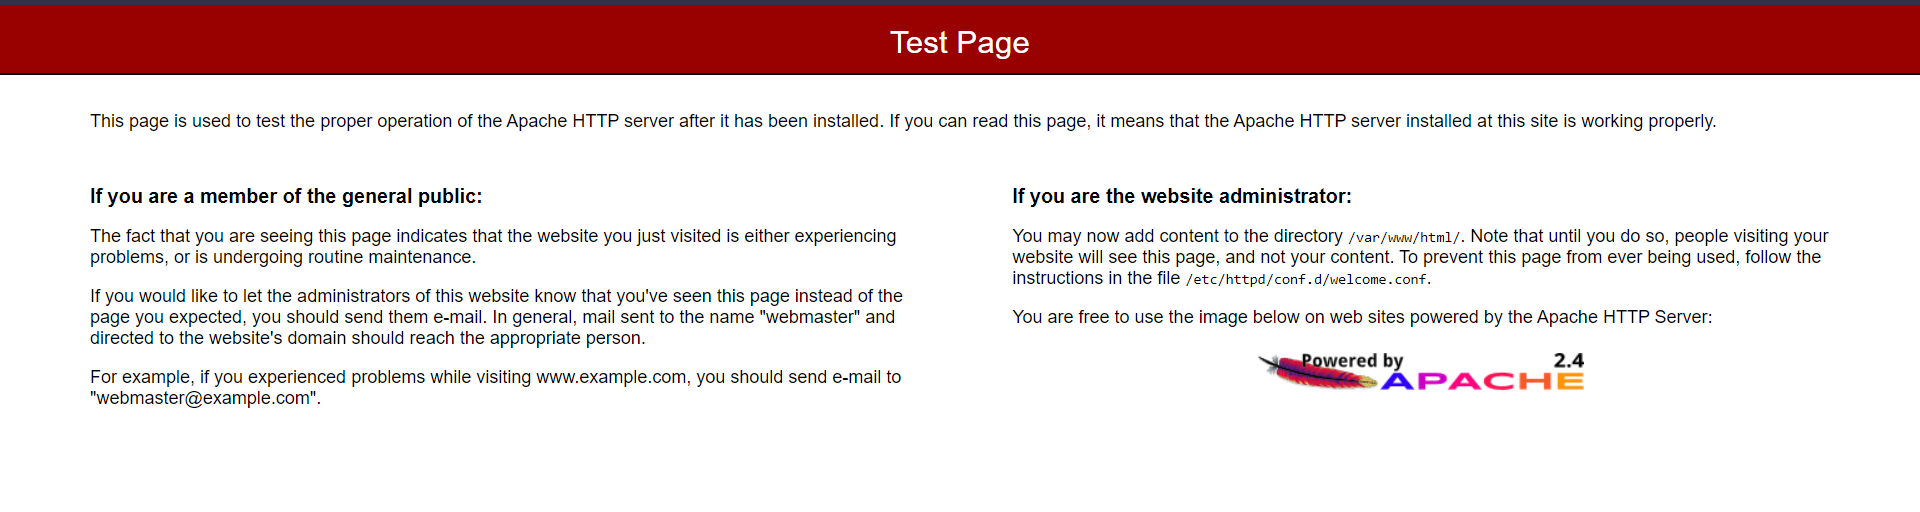
You will see the following page after visiting the public IPV4 address of your instance.
Step 9: Download and configure WordPress
In this step, we will download the WordPress software and set up the configuration.
First, download and uncompress the software by running the following commands in your terminal one by one:
  1. wget https://wordpress.org/latest.tar.gz
  2. tar -xzf latest.tar.gz
Change the directory to the wordpress directory and create a copy of the default config file using the following commands:
  1. cd wordpress
  2. cp wp-config-sample.php wp-config.php
Then, open the wp-config.php file using the nano editor by running the following command.
nano wp-config.phpYou need to edit two areas of configuration.
Edit the database configuration by changing the following lines:
 // ** MySQL settings - You can get this info from your web host ** //
 /** The name of the database for WordPress */
 define( 'DB_NAME', 'database_name_here' );

 /** MySQL database username */
 define( 'DB_USER', 'username_here' );

 /** MySQL database password */
 define( 'DB_PASSWORD', 'password_here' );

 /** MySQL hostname */
 define( 'DB_HOST', 'localhost' );
The values should be:
DB_NAME: “wordpressdb”
DB_USER: "admin"
DB_PASSWORD: The password for the user you created in the previous module
DB_HOST: The hostname of the database that you found in the previous step
You need to configure the Authentication Unique Keys and Salts. It looks as follows in the configuration file:
 /**#@+
  * Authentication Unique Keys and Salts.
  *
  * Change these to different unique phrases!
  * You can generate these using the {@link https://api.wordpress.org/secret-key/1.1/salt/ WordPress.org secret-key service}
  * You can change these at any point in time to invalidate all existing cookies. This will force all users to have to log in again.
  *
  * @since 2.6.0
  */
 define( 'AUTH_KEY',         'put your unique phrase here' );
 define( 'SECURE_AUTH_KEY',  'put your unique phrase here' );
 define( 'LOGGED_IN_KEY',    'put your unique phrase here' );
 define( 'NONCE_KEY',        'put your unique phrase here' );
 define( 'AUTH_SALT',        'put your unique phrase here' );
 define( 'SECURE_AUTH_SALT', 'put your unique phrase here' );
 define( 'LOGGED_IN_SALT',   'put your unique phrase here' );
 define( 'NONCE_SALT',       'put your unique phrase here' );
Go to this link to generate values for this configuration section. You can replace the entire content in that section with the content from the link.
Save and exit from nano by entering CTRL+O followed by CTRL+X.
With the configuration updated, we are almost ready to deploy your WordPress site. In the next step, we will make our WordPress site live.
Step 10: Deploying WordPress
In this step, you will make your Apache web server handle requests for WordPress.
First, install the application dependencies we need for WordPress. In your terminal, run the following command.
sudo amazon-linux-extras install -y lamp-mariadb10.2-php7.2 php7.2Change to the proper directory by running the following command:
cd /home/ec2-userCopy your WordPress application files into the /var/www/html directory used by Apache.
sudo cp -r wordpress/* /var/www/html/Finally, restart the Apache webserver to pick up the changes.
sudo systemctl restart httpdYou should see the WordPress welcome page and the installation process.

That’s it. We have a live, publicly accessible WordPress installation using a fully managed MySQL database on Amazon RDS.
Now, you can fill in your credentials and create a WordPress account.
Conclusion
In this blog, we learned the various steps required to deploy WordPress with Amazon RDS and also its advantages.
I would like to give a shoutout to the Guys in the Cloud team for all the support and guidance.
Thanks for reading, will be back with more blogs soon!


